Connecting Fizzy to Claude

I wrote about using Fizzy with agents and I wanted to share a very normal step by step walk through of how to actually configure Fizzy with all of Claude.
If you are interested in such an absurd thing, I suggest you copy the contents of this post and hand it off to Claude. If you work like I do, you'll run lfg which you have aliased to claude --dangerously-skip-permissions and then you'll paste in this post and write, "Let's set this up. Take it one step at a time."
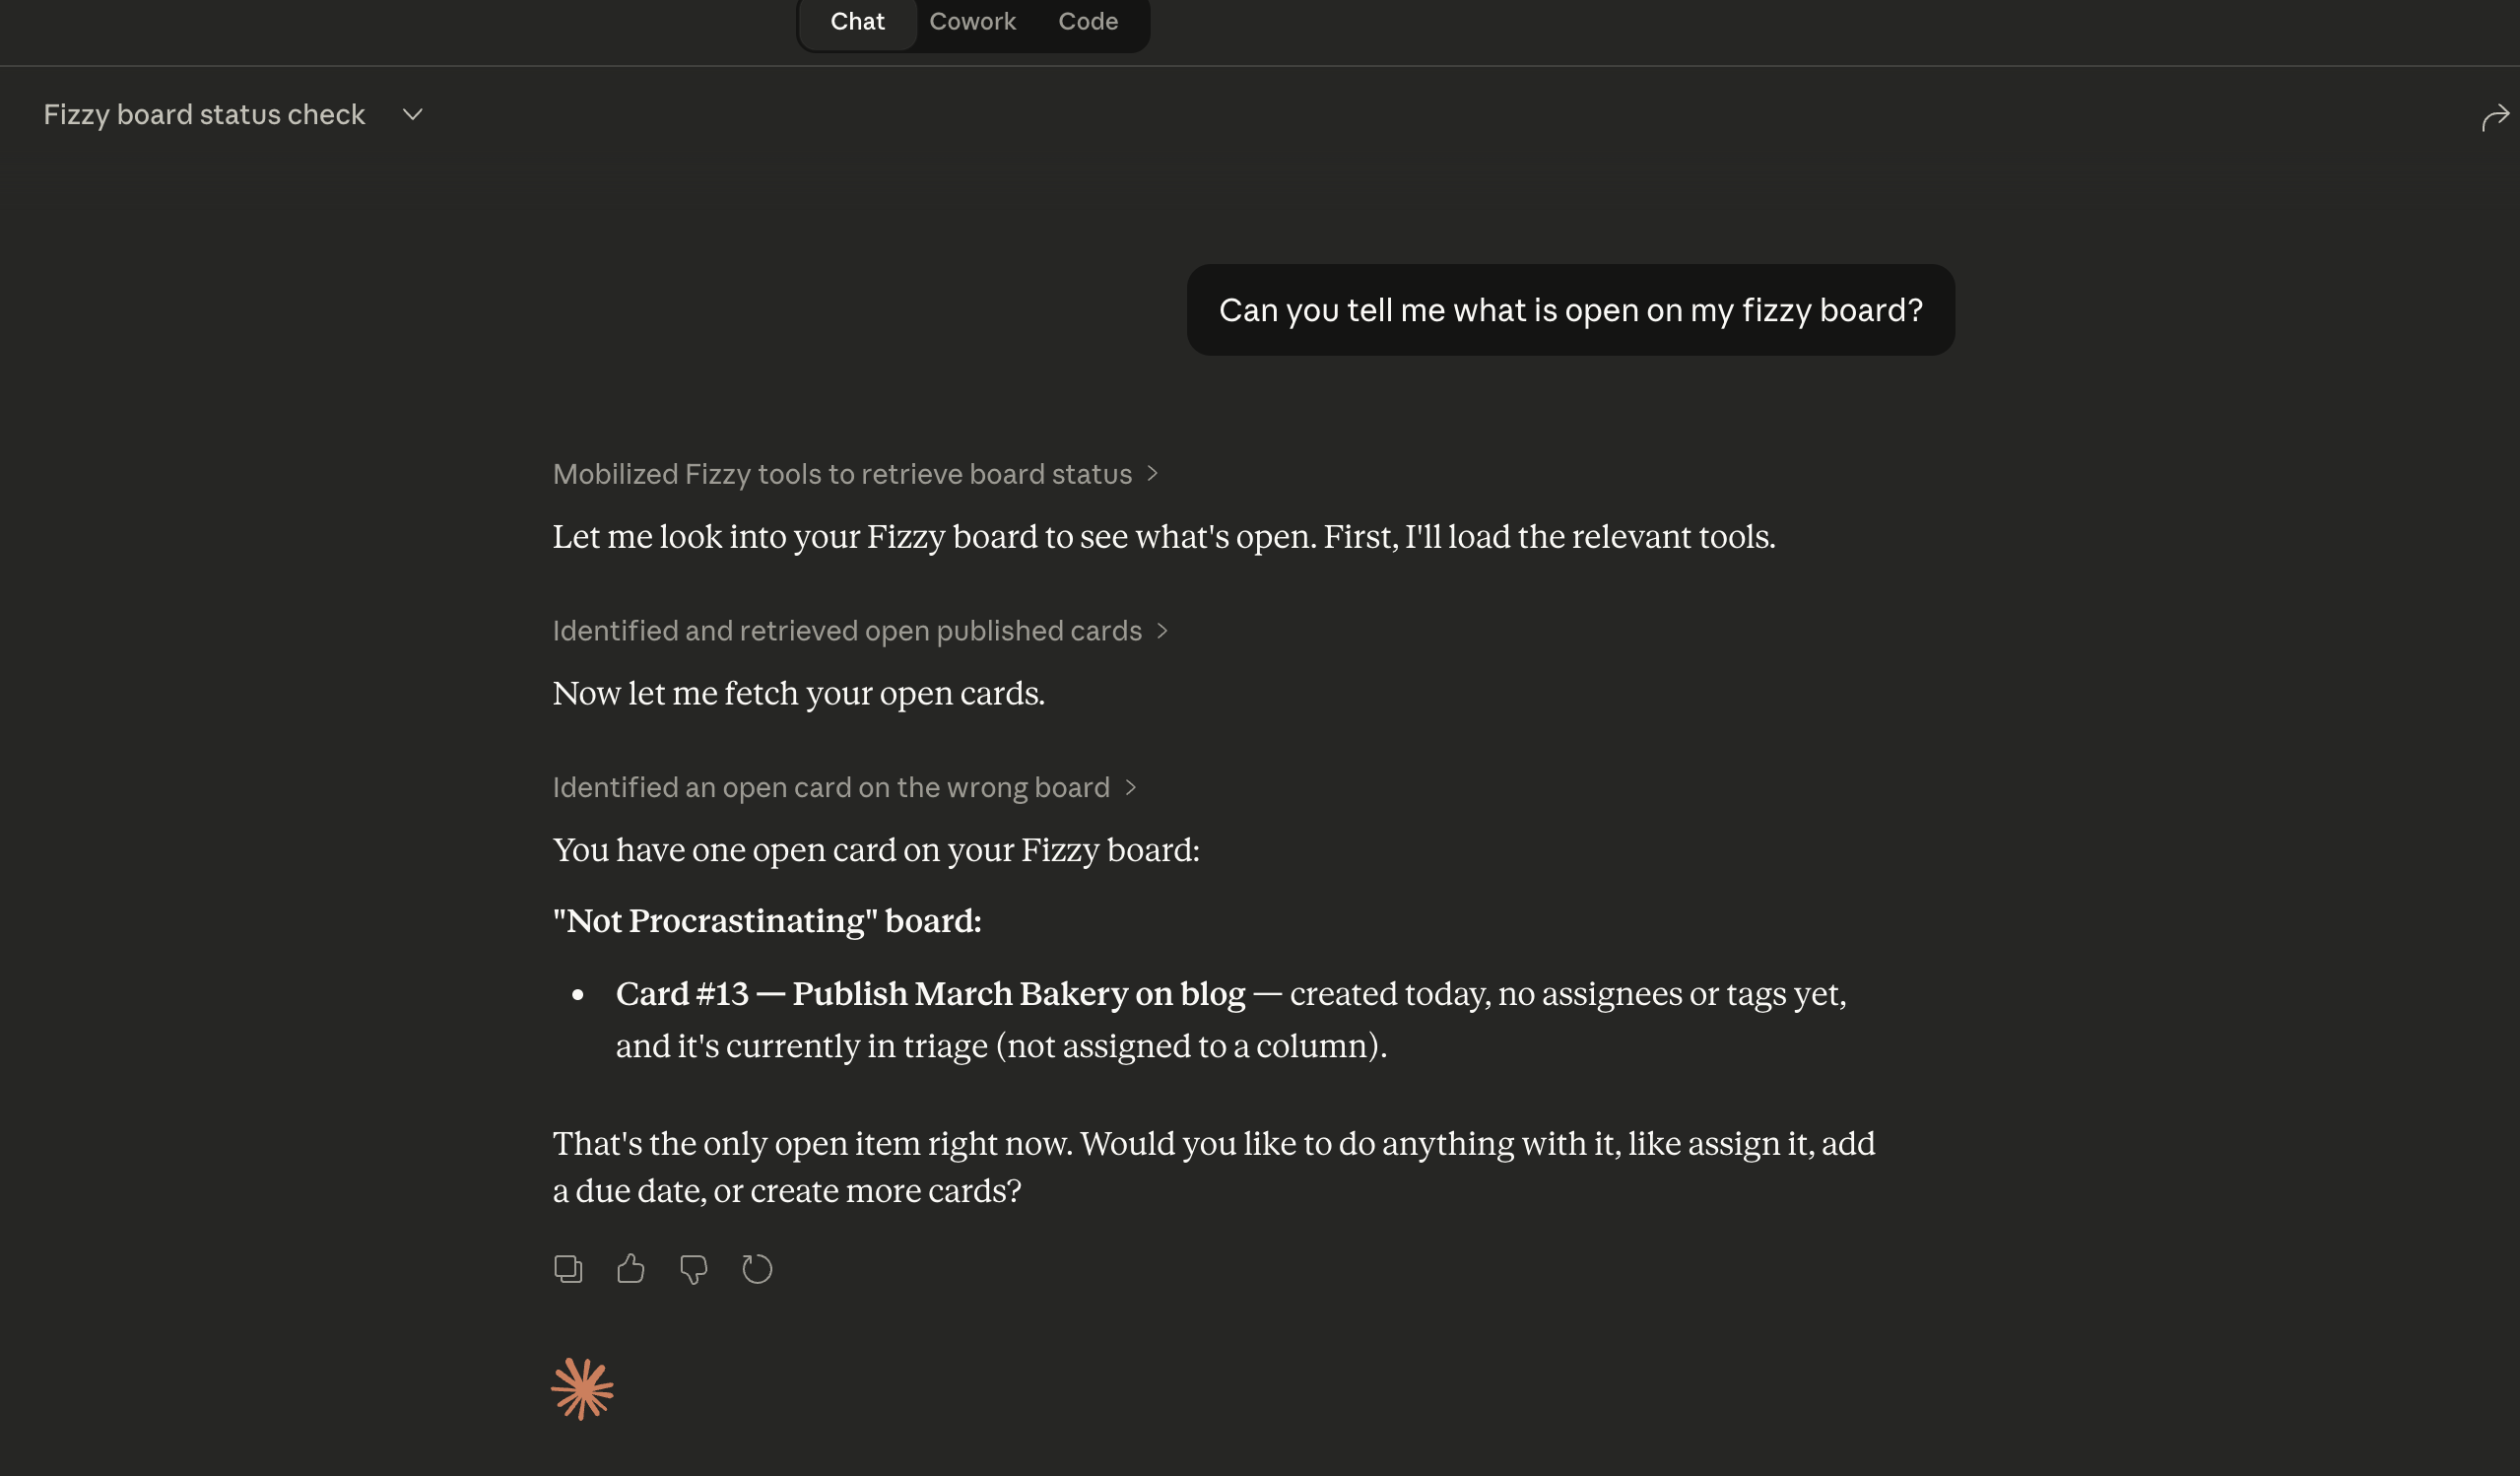
I think in 30 minutes you'll be able to open Claude web, desktop, or code and it will have full read / write access to your personal hosted Fizzy board.
Problem
You want Claude to manage your Fizzy boards — create cards, move them between columns, add comments, close tasks. Claude supports this through MCP (Model Context Protocol), but connecting depends on which Claude surface you use:
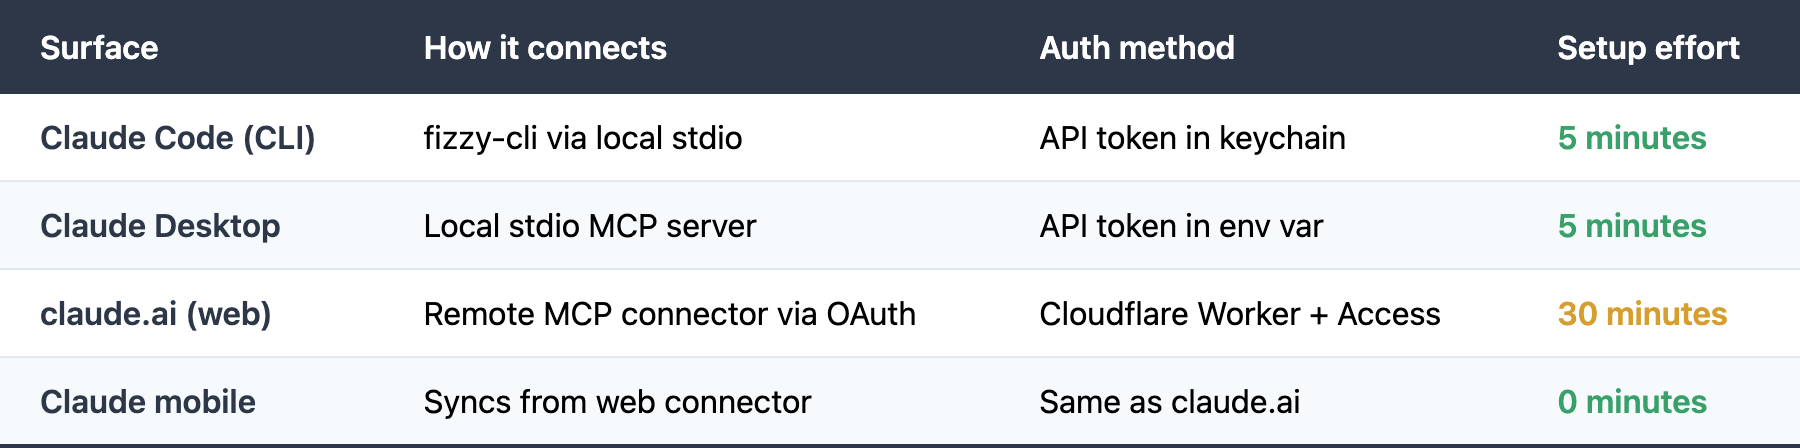
- Claude Code and Claude Desktop run locally on your machine. They can use a local MCP server with your Fizzy API token. Just configure it and go.
- claude.ai (web) and Claude mobile can't use local MCP servers. They connect to remote MCP servers over the internet. claude.ai only speaks OAuth 2.1. You can't paste an API token into the connector UI. Claude insists on doing a full OAuth dance: redirecting users to a login page, exchanging codes for tokens, etc. It's secure, but it's also not totally obvious how to configure.
So if you want Fizzy on claude.ai or mobile, you need an OAuth layer in front of your MCP server. This guide walks through building that layer using free Cloudflare services.
User Experience
Claude Code / Claude Desktop
Nothing special. You configure a local MCP server once. Claude uses your Fizzy API token automatically. You never see an auth flow.
claude.ai (web + mobile)
When you first add the Fizzy connector in claude.ai Settings:
- Claude redirects you to a Cloudflare login page
- You enter your email address
- You receive a one-time PIN via email (a 6-digit code)
- You enter the code on the login page
- You're redirected back to claude.ai — the connector is now active
Only emails you've added to an allowlist can authenticate. If someone who isn't on your list tries to connect, Cloudflare blocks them at step 3. This is how you control who can access your Fizzy boards through Claude.
After the initial setup, you don't see the login flow again until the session expires. Mobile access syncs automatically from the web connector — no separate login needed.
Architecture
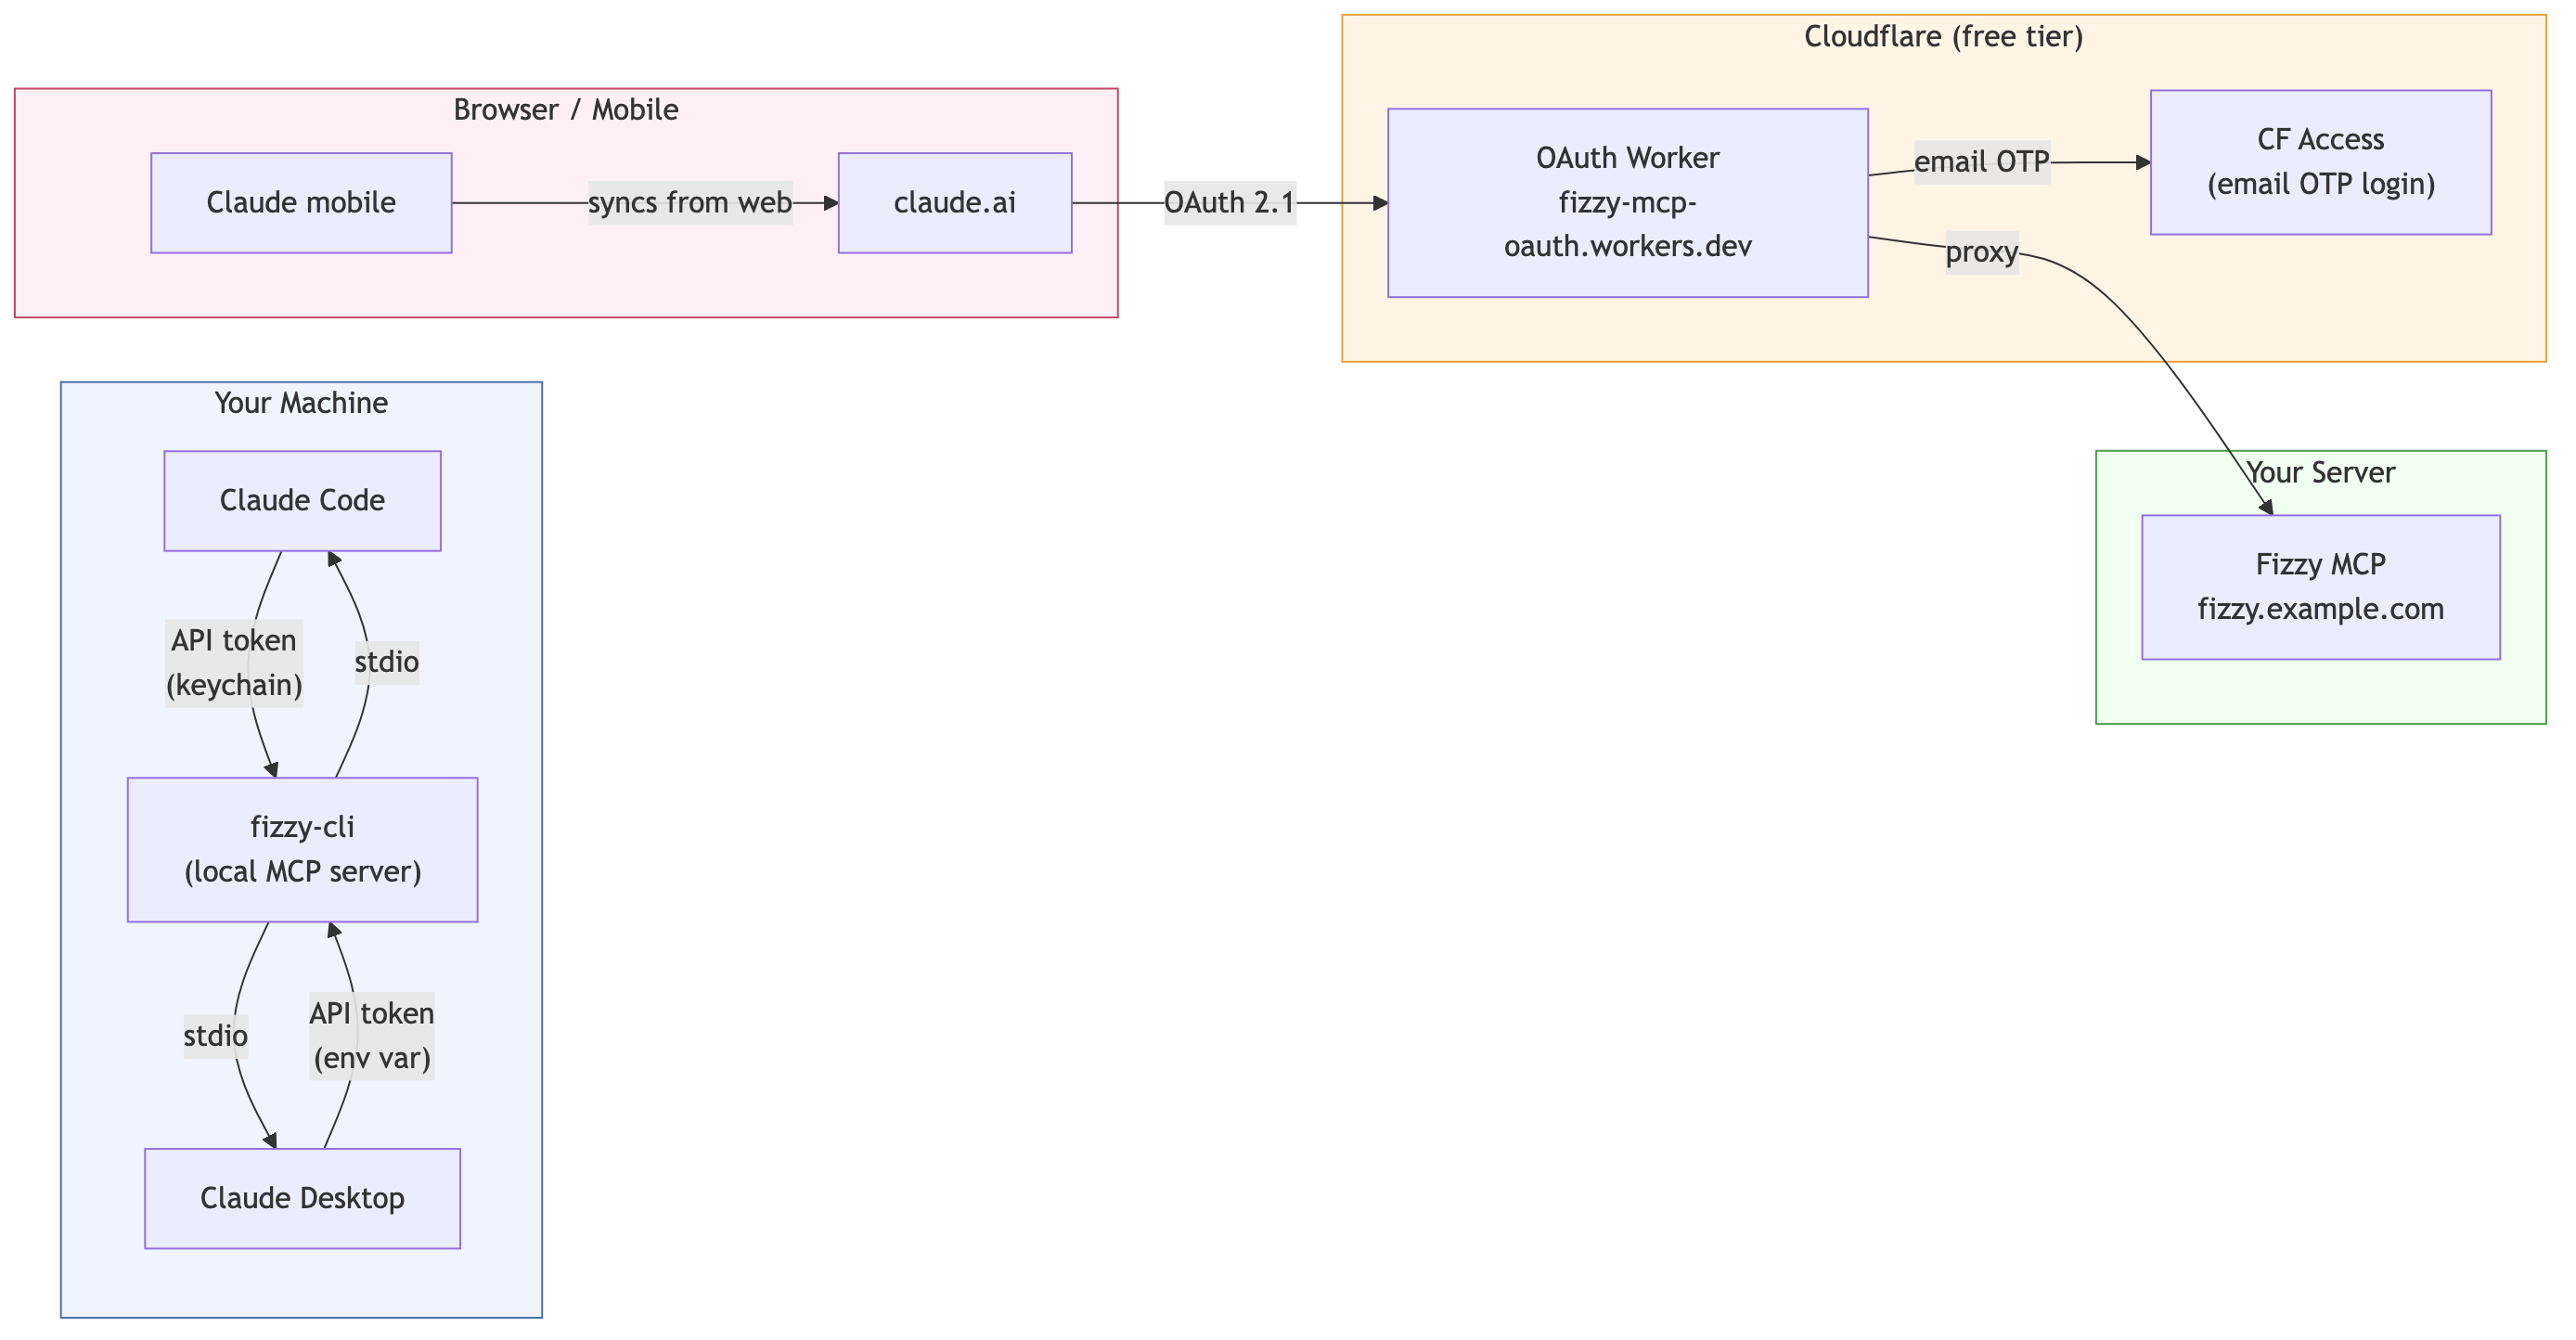
The OAuth layer for claude.ai uses two free Cloudflare services:
- Cloudflare Workers — a tiny TypeScript proxy (~100 lines) that presents OAuth endpoints to Claude and forwards authenticated requests to your MCP server
- Cloudflare Access — handles the email login flow (the one-time PIN). You configure an allowlist of emails that are permitted to authenticate.
Part 1: Claude Code
Install the fizzy CLI and configure it as an MCP server for Claude Code.
# Install fizzy-cli (adjust for your package manager)
npm install -g fizzy-cli

# Store your Fizzy API token
fizzy-cli auth login
# Follow the prompts — token is stored in your system keychain

# Add to Claude Code's MCP config (~/.claude/settings.json or project .claude/settings.json)
Add to your Claude Code MCP configuration:
{
  "mcpServers": {
    "fizzy": {
      "command": "fizzy-cli",
      "args": ["mcp", "serve"],
      "env": {
        "FIZZY_URL": "https://fizzy.example.com"
      }
    }
  }
}
Part 2: Claude Desktop
Add to Claude Desktop's config file (~/Library/Application Support/Claude/claude_desktop_config.json on macOS):
{
  "mcpServers": {
    "fizzy": {
      "command": "fizzy-cli",
      "args": ["mcp", "serve"],
      "env": {
        "FIZZY_URL": "https://fizzy.example.com",
        "FIZZY_TOKEN": "your-api-token-here"
      }
    }
  }
}
Restart Claude Desktop after saving.
Part 3: claude.ai (Web + Mobile)
This section sets up the OAuth gateway described in "The Problem" above. You'll need a free Cloudflare account.
How the OAuth flow works
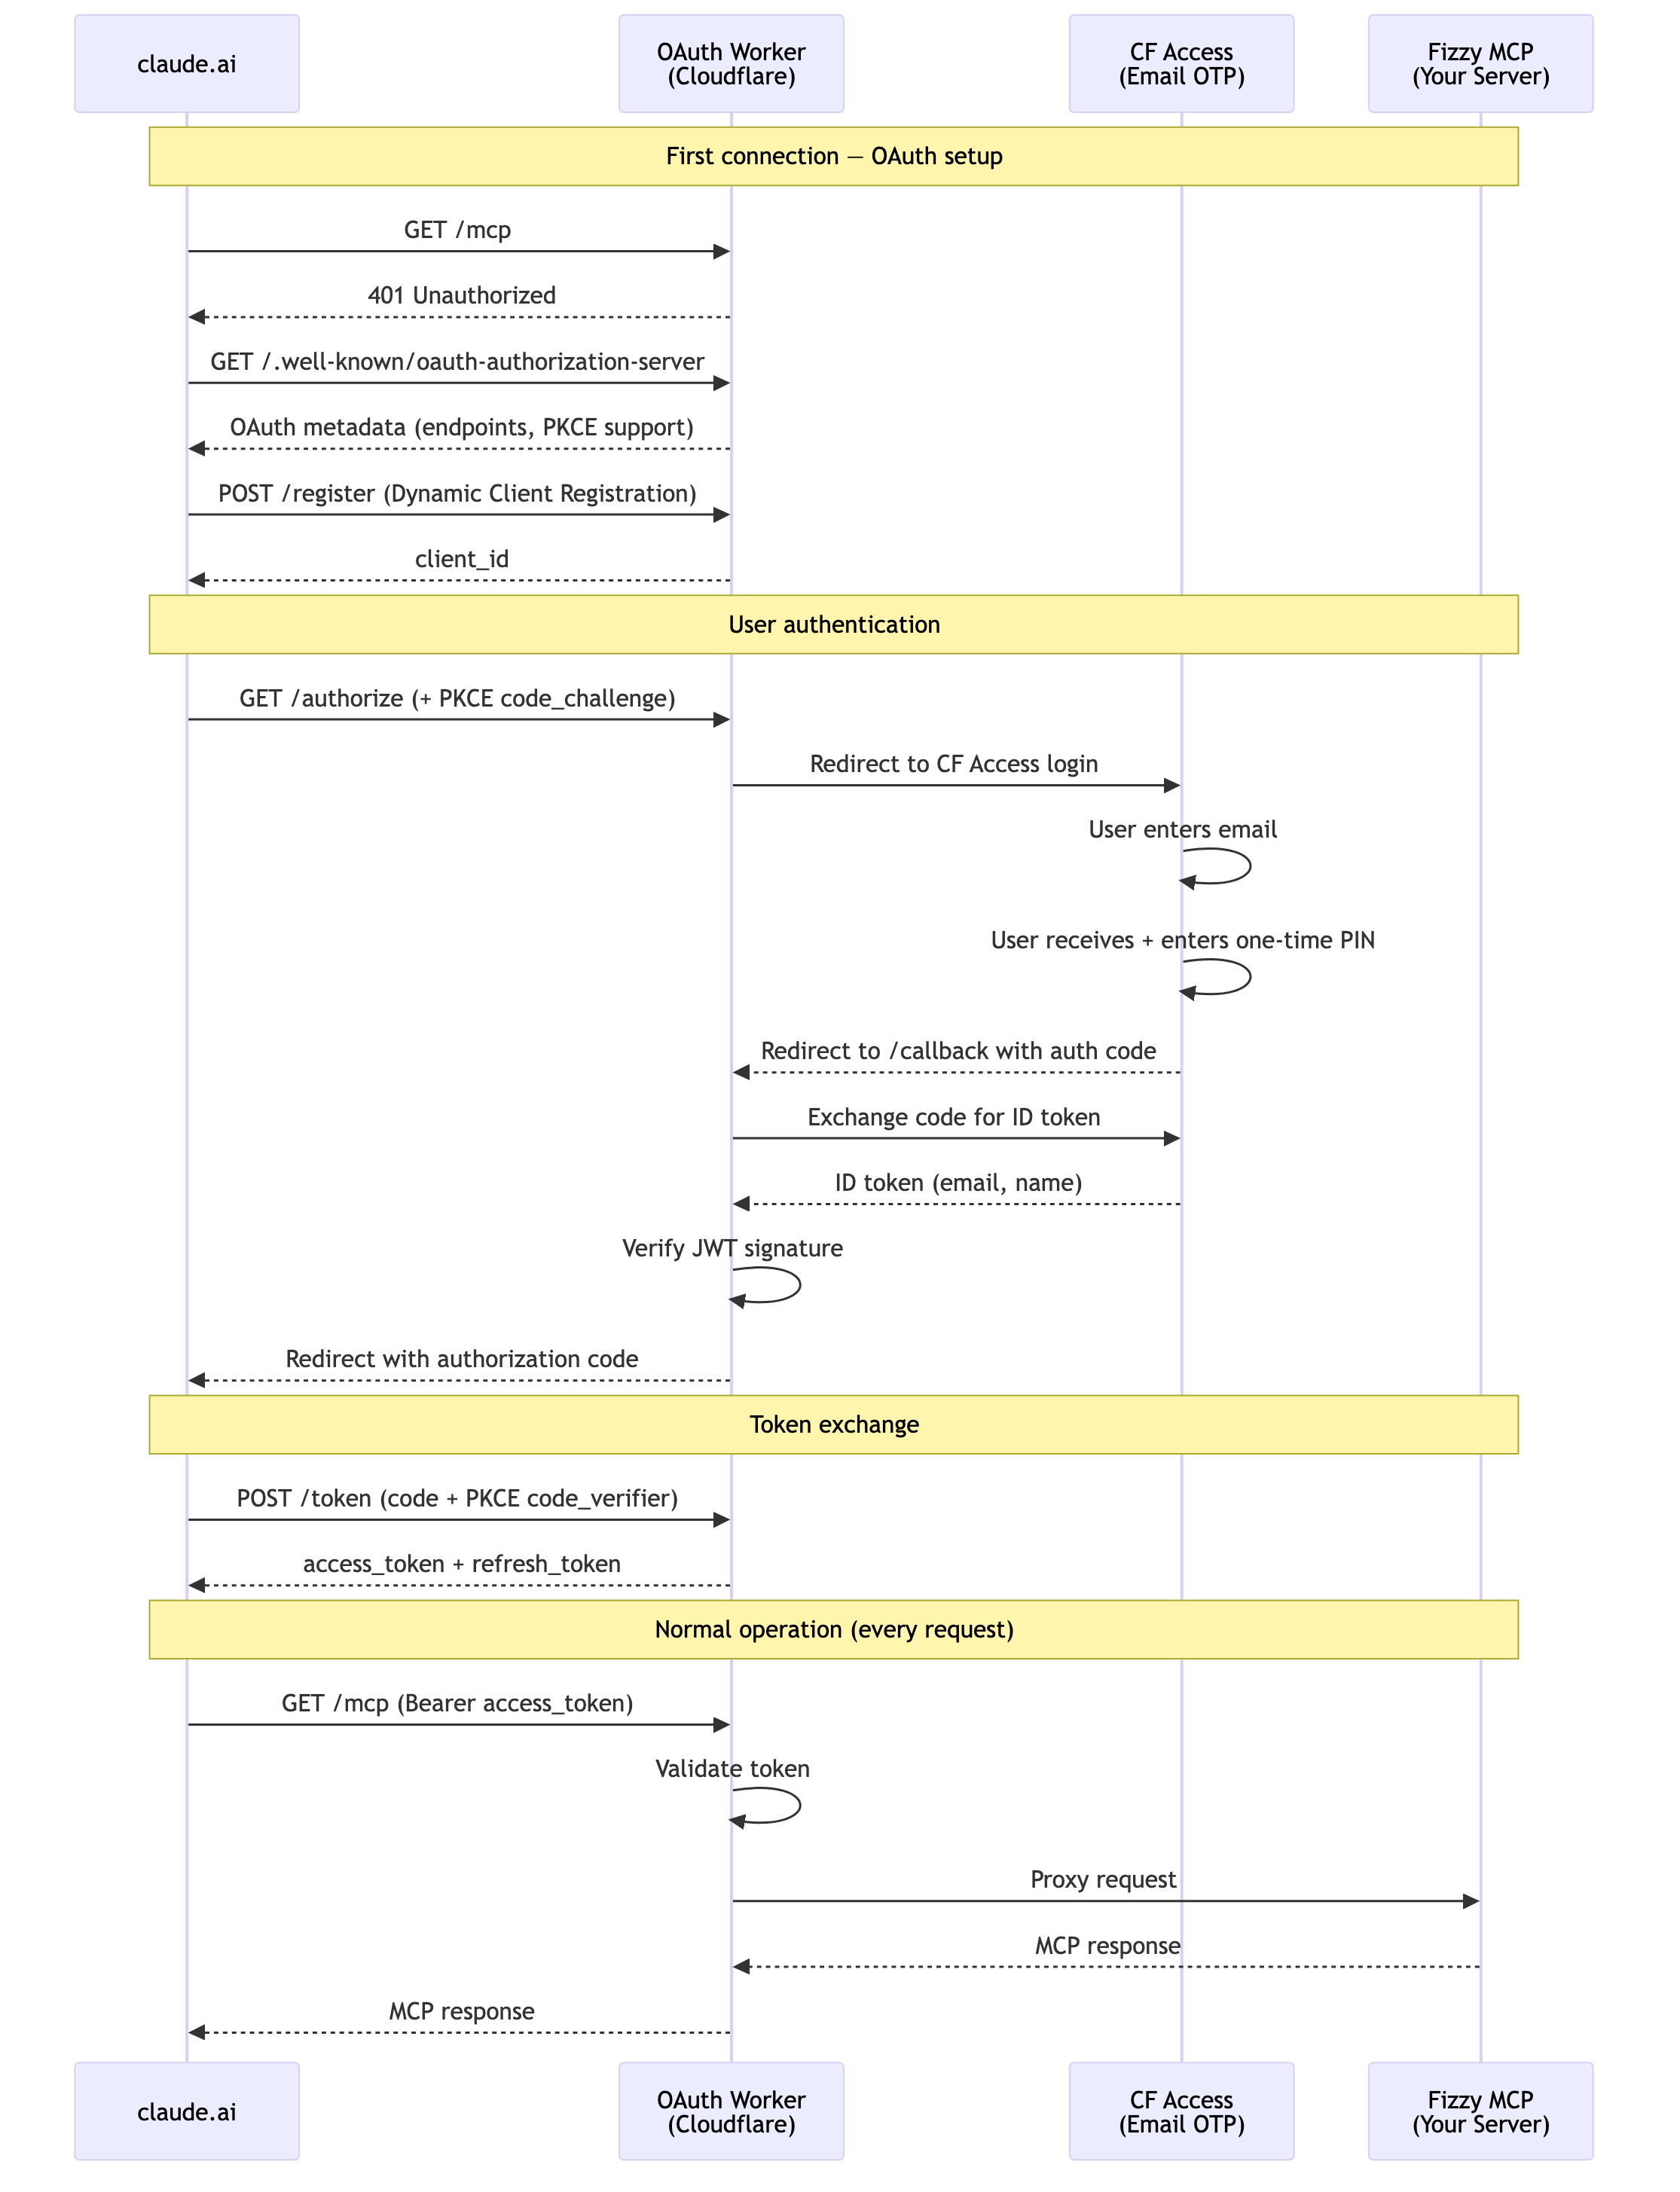
The @cloudflare/workers-oauth-provider library handles the OAuth protocol automatically — discovery metadata, client registration, token issuance/refresh, PKCE validation, and token storage. You only write three things: (1) /authorize — redirect the user to CF Access for email verification, (2) /callback — receive the user back and complete the OAuth flow, and (3) the proxy — forward authenticated requests to your Fizzy server.
Step 1: Cloudflare Account Setup
You need a Cloudflare account (free tier).
- Go to dash.cloudflare.com
- Note your Workers subdomain under Workers & Pages (e.g.
yourname.workers.dev) - Note your Account ID (shown on the Workers & Pages overview)
Step 2: Create a Zero Trust Team
- Go to one.dash.cloudflare.com
- Create a team name (e.g.
myteam→ gives youmyteam.cloudflareaccess.com) - Select the Free plan (up to 50 users)
Step 3: Create an Access for SaaS Application
This sets up Cloudflare Access as an OIDC identity provider that the Worker delegates to for user authentication.
- Zero Trust dashboard → Access controls → Applications → Add an application → SaaS
- Fill in:
- Application name:
Fizzy MCP - Authentication protocol: OIDC
- Scopes:
openid,email(required),profile(optional) - Redirect URL:
https://fizzy-mcp-oauth.<your-workers-subdomain>.workers.dev/callback - PKCE: Leave OFF
- Application name:
- Copy the Client Secret — it's only shown once
- Save the application
Note the Client ID from the application URL:
<team>.cloudflareaccess.com/cdn-cgi/access/sso/oidc/<CLIENT_ID>
Save both the Client ID and Client Secret somewhere secure.
Step 4: Create an Access Policy (Email Allowlist)
- Zero Trust dashboard → Access controls → Policies → Add a policy
- Policy name:
Allowed Users - Action: Allow
- Under Include, for each email you want to authorize:
- Selector:
Emails - Value: the email address
- Rows use OR logic — any matching email is allowed
- Selector:
- Save the policy
- Go to Applications → Fizzy MCP → Policies tab and verify the policy is attached
Users authenticate via email one-time PIN (the default when no other identity provider is configured).
Step 5: Create the Worker Project
mkdir -p fizzy-mcp-oauth/src
cd fizzy-mcp-oauth
git init
package.json:
{
  "name": "fizzy-mcp-oauth",
  "version": "1.0.0",
  "private": true,
  "scripts": {
    "deploy": "wrangler deploy",
    "dev": "wrangler dev"
  },
  "dependencies": {
    "@cloudflare/workers-oauth-provider": "^0.3.1",
    "agents": "^0.8.6"
  },
  "devDependencies": {
    "wrangler": "^4.0.0",
    "typescript": "^5.7.0",
    "@types/node": "^22.0.0"
  }
}
npm install
wrangler.jsonc:
{
  "$schema": "node_modules/wrangler/config-schema.json",
  "name": "fizzy-mcp-oauth",
  "main": "src/index.ts",
  "compatibility_date": "2026-03-10",
  "compatibility_flags": ["nodejs_compat"],
  "kv_namespaces": [
    {
      "binding": "OAUTH_KV",
      "id": "<your-kv-namespace-id>"  // created in Step 7
    }
  ],
  "observability": { "enabled": true }
}
src/types.ts:
import type { OAuthHelpers } from "@cloudflare/workers-oauth-provider";

export interface Env {
  OAUTH_KV: KVNamespace;
  OAUTH_PROVIDER: OAuthHelpers;
  ACCESS_CLIENT_ID: string;
  ACCESS_CLIENT_SECRET: string;
  ACCESS_AUTHORIZATION_URL: string;
  ACCESS_TOKEN_URL: string;
  ACCESS_JWKS_URL: string;
  FIZZY_MCP_URL: string;
  COOKIE_ENCRYPTION_KEY: string;
}

export interface Props {
  email: string;
  sub: string;
  name: string;
}
src/index.ts — Entry point. The OAuthProvider handles all OAuth ceremony (metadata, registration, token issuance, PKCE validation). The proxyHandler forwards authenticated requests to your Fizzy MCP server:
import OAuthProvider from "@cloudflare/workers-oauth-provider";
import { handleAccessRequest } from "./access-handler";
import type { Env } from "./types";

const proxyHandler = {
  async fetch(request: Request, env: Env, ctx: ExecutionContext): Promise<Response> {
    const url = new URL(request.url);
    const upstream = new URL(url.pathname + url.search, env.FIZZY_MCP_URL);

    const headers = new Headers(request.headers);
    headers.delete("authorization");

    const response = await fetch(upstream.toString(), {
      method: request.method,
      headers,
      body: request.body,
    });

    return new Response(response.body, {
      status: response.status,
      statusText: response.statusText,
      headers: response.headers,
    });
  },
};

export default new OAuthProvider({
  apiRoute: "/mcp",
  apiHandler: proxyHandler,
  defaultHandler: { fetch: handleAccessRequest as any },
  authorizeEndpoint: "/authorize",
  tokenEndpoint: "/token",
  clientRegistrationEndpoint: "/register",
});
src/access-handler.ts — Handles the two-step redirect: Worker → CF Access → Worker. On /authorize, it stashes Claude's OAuth request in KV and redirects to CF Access. On /callback, it exchanges the CF Access code for an ID token, verifies it, and completes the OAuth flow back to Claude:
import { Buffer } from "node:buffer";
import type { AuthRequest, OAuthHelpers } from "@cloudflare/workers-oauth-provider";
import type { Env, Props } from "./types";

type EnvWithOAuth = Env & { OAUTH_PROVIDER: OAuthHelpers };

export async function handleAccessRequest(
  request: Request,
  env: EnvWithOAuth,
  _ctx: ExecutionContext,
): Promise<Response> {
  const { pathname } = new URL(request.url);

  if (request.method === "GET" && pathname === "/authorize") {
    return handleAuthorize(request, env);
  }
  if (request.method === "GET" && pathname === "/callback") {
    return handleCallback(request, env);
  }
  return new Response("Not Found", { status: 404 });
}

async function handleAuthorize(request: Request, env: EnvWithOAuth): Promise<Response> {
  const oauthReqInfo = await env.OAUTH_PROVIDER.parseAuthRequest(request);
  if (!oauthReqInfo.clientId) {
    return new Response("Missing client_id", { status: 400 });
  }

  const stateToken = crypto.randomUUID();
  await env.OAUTH_KV.put(
    `state:${stateToken}`,
    JSON.stringify(oauthReqInfo),
    { expirationTtl: 600 },
  );

  const params = new URLSearchParams({
    client_id: env.ACCESS_CLIENT_ID,
    redirect_uri: new URL("/callback", request.url).href,
    response_type: "code",
    scope: "openid email profile",
    state: stateToken,
  });

  return Response.redirect(`${env.ACCESS_AUTHORIZATION_URL}?${params}`, 302);
}

async function handleCallback(request: Request, env: EnvWithOAuth): Promise<Response> {
  const url = new URL(request.url);
  const code = url.searchParams.get("code");
  const stateToken = url.searchParams.get("state");

  if (!code || !stateToken) {
    return new Response("Missing code or state", { status: 400 });
  }

  const stored = await env.OAUTH_KV.get(`state:${stateToken}`);
  if (!stored) {
    return new Response("Invalid or expired state", { status: 400 });
  }
  await env.OAUTH_KV.delete(`state:${stateToken}`);
  const oauthReqInfo: AuthRequest = JSON.parse(stored);

  const tokenResponse = await fetch(env.ACCESS_TOKEN_URL, {
    method: "POST",
    headers: { "Content-Type": "application/x-www-form-urlencoded" },
    body: new URLSearchParams({
      grant_type: "authorization_code",
      client_id: env.ACCESS_CLIENT_ID,
      client_secret: env.ACCESS_CLIENT_SECRET,
      code,
      redirect_uri: new URL("/callback", request.url).href,
    }),
  });

  if (!tokenResponse.ok) {
    const text = await tokenResponse.text();
    return new Response(`Token exchange failed: ${text}`, { status: 502 });
  }

  const tokens = (await tokenResponse.json()) as { id_token: string; access_token: string };
  const claims = await verifyIdToken(tokens.id_token, env.ACCESS_JWKS_URL);

  const { redirectTo } = await env.OAUTH_PROVIDER.completeAuthorization({
    request: oauthReqInfo,
    userId: claims.sub,
    metadata: { label: claims.email },
    scope: oauthReqInfo.scope,
    props: {
      email: claims.email,
      sub: claims.sub,
      name: claims.name || claims.email,
    } as Props,
  });

  return Response.redirect(redirectTo, 302);
}

async function verifyIdToken(
  token: string,
  jwksUrl: string,
): Promise<{ email: string; sub: string; name?: string }> {
  const parts = token.split(".");
  if (parts.length !== 3) throw new Error("Invalid JWT");

  const header = JSON.parse(Buffer.from(parts[0], "base64url").toString());
  const payload = JSON.parse(Buffer.from(parts[1], "base64url").toString());

  const resp = await fetch(jwksUrl);
  const { keys } = (await resp.json()) as { keys: (JsonWebKey & { kid: string })[] };
  const jwk = keys.find((k) => k.kid === header.kid);
  if (!jwk) throw new Error("No matching key found in JWKS");

  const key = await crypto.subtle.importKey(
    "jwk",
    jwk,
    { name: "RSASSA-PKCS1-v1_5", hash: "SHA-256" },
    false,
    ["verify"],
  );

  const verified = await crypto.subtle.verify(
    "RSASSA-PKCS1-v1_5",
    key,
    Buffer.from(parts[2], "base64url"),
    Buffer.from(`${parts[0]}.${parts[1]}`),
  );

  if (!verified) throw new Error("JWT signature verification failed");
  if (payload.exp && payload.exp < Math.floor(Date.now() / 1000)) {
    throw new Error("JWT expired");
  }

  return payload;
}
Step 6: Authenticate Wrangler
npx wrangler login
Opens a browser window to authorize wrangler with your Cloudflare account. One-time setup.
Step 7: Create KV Namespace
npx wrangler kv namespace create "OAUTH_KV"
Copy the id from the output into wrangler.jsonc.
Step 8: Set Worker Secrets
Replace <team> with your Zero Trust team name, <CLIENT_ID> with the CF Access Client ID from Step 3.
echo "<CLIENT_ID>" | npx wrangler secret put ACCESS_CLIENT_ID
echo "<CLIENT_SECRET>" | npx wrangler secret put ACCESS_CLIENT_SECRET
echo "https://<team>.cloudflareaccess.com/cdn-cgi/access/sso/oidc/<CLIENT_ID>/authorization" | npx wrangler secret put ACCESS_AUTHORIZATION_URL
echo "https://<team>.cloudflareaccess.com/cdn-cgi/access/sso/oidc/<CLIENT_ID>/token" | npx wrangler secret put ACCESS_TOKEN_URL
echo "https://<team>.cloudflareaccess.com/cdn-cgi/access/sso/oidc/<CLIENT_ID>/jwks" | npx wrangler secret put ACCESS_JWKS_URL
echo "https://fizzy.example.com" | npx wrangler secret put FIZZY_MCP_URL
openssl rand -hex 32 | npx wrangler secret put COOKIE_ENCRYPTION_KEY
Step 9: Deploy
npx wrangler deploy
Verify the OAuth discovery endpoint is working:
curl https://fizzy-mcp-oauth.<subdomain>.workers.dev/.well-known/oauth-authorization-server
You should see JSON with authorization_endpoint, token_endpoint, registration_endpoint, and code_challenge_methods_supported.
Step 10: Add the Connector in claude.ai
- claude.ai → Settings → Connectors → Add custom connector
- Name: Fizzy
- Remote MCP server URL:
https://fizzy-mcp-oauth.<subdomain>.workers.dev/mcp - Leave Client ID and Client Secret blank (Claude auto-registers)
- Save
Claude will redirect you to Cloudflare Access to verify your email. Enter the one-time PIN sent to your email. After authenticating, the connector is active.
Mobile access syncs automatically from the web connector — no separate setup needed.
Maintenance
Redeploy after code changes
cd fizzy-mcp-oauth && npx wrangler deploy
Update a secret
echo "new-value" | npx wrangler secret put SECRET_NAME
Add or remove allowed emails
Zero Trust dashboard → Access controls → Policies → "Allowed Users" → Edit.
View live Worker logs
cd fizzy-mcp-oauth && npx wrangler tail
Rotate the CF Access Client Secret
- Zero Trust → Applications → Fizzy MCP → Basic information → Reset secret
- Copy the new secret
echo "<new-secret>" | npx wrangler secret put ACCESS_CLIENT_SECRET
Cost
All services used are free tier:
- Cloudflare Workers: 100,000 requests/day
- Cloudflare Access: up to 50 users
- Cloudflare KV: 100,000 reads/day, 1,000 writes/day
For personal use this is effectively $0.
Member discussion